About Us
For 25 years, 3 Star Hardwood Floor has been a trusted name in the flooring industry, providing expert services to residential and commercial clients. Founded by Martin Pablo, our company has built a reputation for deliv...
Read More
Hardwood Floor Refinishing: A Comprehensive Guide
Hardwood floors are a timeless addition to any home, known for their durability and aesthetic appeal. However, over time, even the most well-maintained hardwood floors can show signs of wear and tear. Refinishing your hardwood floors can breathe new life into them, restoring their original beauty and extending their lifespan. This guide will cover the basics of hardwood floor refinishing, how to determine if your floor would benefit from refinishing, tips for ensuring proper service, the importance of using the right materials, and when to consider professional help.
What is Hardwood Floor Refinishing?
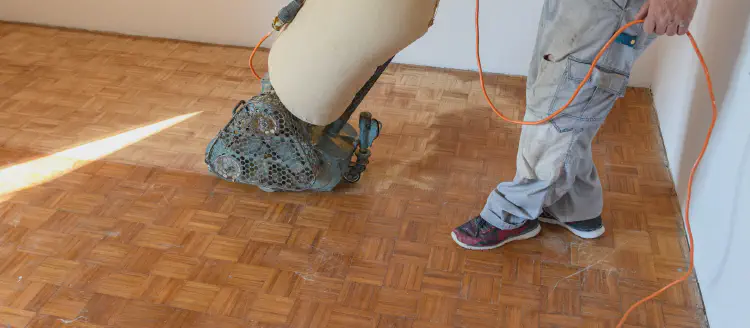
Refinishing involves sanding down the top layer of the hardwood to remove surface-level damage like scratches, scuffs, and minor stains. After sanding, a new coat of finish is applied, which can restore the floor’s original shine and protect it from future damage.
Signs Your Floor Needs Refinishing:
- Visible Scratches and Dents: If your hardwood floors have numerous visible scratches or dents, refinishing can help restore their smooth surface.
- Fading or Discoloration: Sunlight and age can cause hardwood floors to fade or develop a yellowish tint. Refinishing can bring back their original color.
- Water Damage: Stains from water spills or pet accidents can seep into the wood. Refinishing can often remove these stains if they haven’t penetrated too deeply.
- Dullness: If your floor has lost its shine and regular cleaning doesn’t restore its luster, refinishing can help.
How to Test:
- Water Droplet Test: Drop a small amount of water onto the floor. If the water beads up, the finish is still in good condition. If it soaks in quickly, it’s time to refinish.
- Screen and Recoat: If the floor isn’t deeply damaged, a simple screen and recoat (a lighter sanding followed by a new finish) might be sufficient.
Ensuring a Proper Refinishing Service:
- Clear the Room: Ensure all furniture and rugs are removed from the area to be refinished.
- Clean Thoroughly: Vacuum and sweep the floor to remove any dirt and debris before the refinishing process begins.
During the Service:
- Proper Sanding: The sanding process should be done evenly to avoid any dips or uneven spots. Multiple passes with finer grit sandpaper are necessary for a smooth finish.
- Dust Control: Refinishing can be a messy job. Ensure that your contractor uses dustless sanding equipment to minimize the mess in your home.
After the Service:
- Curing Time: Allow the finish to cure properly before moving furniture back in. This can take anywhere from 24 hours to a week, depending on the type of finish used.
- Ventilation: Proper ventilation is crucial during and after the refinishing process to help with the curing process and to reduce the fumes from the finish.
Types of Finishes:
- Oil-Based Polyurethane: Durable and gives a warm glow to the wood. However, it has a longer drying time and a stronger odor.
- Water-Based Polyurethane: Faster drying with a lower odor. It provides a clear finish that won’t yellow over time.
- Wax Finish: Gives a soft, natural look but requires regular maintenance.
- Penetrating Oils: Enhance the natural grain of the wood but may require more frequent reapplication.
Choosing the Right Sandpaper:
- Coarse Grit (36-60): For initial sanding to remove old finish and deep scratches.
- Medium Grit (80-100): For smoothing the surface after the initial sanding.
- Fine Grit (120-150): For the final pass to ensure a smooth surface before applying the finish.
Common Issues During Refinishing
- Uneven Sanding: Can lead to dips or an uneven finish. It’s crucial to use the right sanding technique.
- Dust Contamination: Dust can settle on the wet finish, leading to a rough texture. Using dust control measures is essential.
- Streaks in the Finish: Often caused by improper application of the finish. It’s important to apply the finish evenly with the correct tools.
- Bubbling in the Finish: This can happen if the finish is applied too thickly or if the floor was not properly cleaned before application.
DIY vs. Professional Service:
While DIY refinishing kits are available, professional refinishing ensures a high-quality result. Professionals have the experience and equipment to handle large projects efficiently and avoid common mistakes.
Why Choose a Professional:
- Experience: Professionals can assess the condition of your floor and recommend the best refinishing method.
- Time-Saving: Refinishing is a labor-intensive process. Hiring a professional can save you time and ensure the job is done correctly.
- Quality: Professional refinishing will result in a smoother, more durable finish that can last for years.